Friday 30 September 2011

Woodware Design Team - Something for the Boys

This week I decided to do a fun card to fit the brief fo "Something for the Boys". I had a rake through my Woodware stamps and found this set that Francoise designed called "Jungle Pals".
FRCL127 

This is a great set for boys and girls. I often make a Criss Cross card for my nieces and nephews as it's a nice way to tuck in a gift card or some money. 
To make the basic pocket, cut a 12 x 12 sheet of card in half. Score both down the middle as if you are making a 6" card blank. On one cut from the top centre to the bottom right corner (so you have a 6 in square with a triangle attached). On the second piece cut from top centre to bottom left. Stick one square on top of the other and fold in the two flaps. Run a line of DS tape along the bottom edge of both the flaps and stick down.
Then cut a strip of card to form the wrap around band and you are ready to decorate. 
If any one is interested in more details, then I could do it as a tutorial.

The insert is where you can write your message.

It's nice too to make a matching bookmark, which can also get tucked into the pocket.


I did this idea in a Christmas workshop
which seemed quite popular.
Check out the Woodware blog for more details on stockists


When you see this post appear I will be on my way to Ireland to see my Dad and sister. My sister Michelle loves crafting too so I am making up a goody box to take over. There aren't so many craft shops where she lives so she is alway happy to get a few new things to play with.
Siobhan

Tuesday 27 September 2011

The Old Jalopy

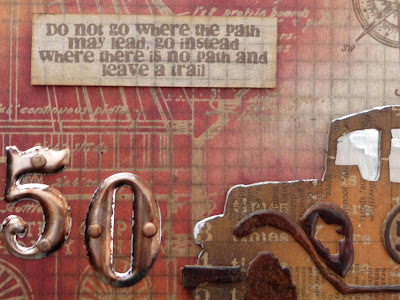
I am talking about the car here and not my husband Graham!! It's his 50th birthday next week so I thought I better get a card done as we are going to Ireland on Friday to see my Dad and sister.
I bought this lovely Sizzix Tim Holtz die at The Stamp Man in Skipton, when we went down to the retreat. I have been dying to have a play with it. I love it!!

The Old Jalopy
I used some of the gorgeous papers from Tim Holtz's Kraft Resist Paper Stash for the car and the background. I wasn't sure where all the bits of wheels and fenders went but I think they look OK. I even put acetate behind the windows with a bit of silver alcohol ink to look like sunlight reflecting off the glass.


The silver numbers were altered with alcohol inks. The sentiment came from a new Indigo Blur set (as did the compass dial) "Grand Tour III".


And as a finishing touch I added a steam punk charm. My friend Linda and I bought a heap of great charms at Embsay crafts also when we were down for the retreat.
I think my hubby will like this. He never looks at my blog so I can share it now before his big day!!

Monday 26 September 2011

Creative Expressions - Vintage Typewriter

This month's featured stamps are by Sam Poole called "Vintage Typewriter. There are lots of great elements to use. 

  
UMVINTTYPE  Vintage Typewriter
 I love the old typewriter and ink bottle. So here's my first offering with these stamps.


I think it's pretty straight forward. I masked the ink bottle on it's side to stamp one in behind it. This set could be used for men's cards as well as for women. A good all rounder!!
These stamps are available from Creative Expressions and their stockists. You will also find links to all the other members of the DT in the side bar under the Creative Expressions logo. I have seen some great samples so far and this is only the first week!!
Siobhan

Saturday 24 September 2011

Background Tutorial - Water Stamping

I have been asked by a few people how to do the subtle negative resist background that I used in some cards I have made recently. So I decided to have a go at a mini tutorial. I haven't figured out how to have a separate page for this so I will do it as a normal blog post. This is a card I made several of last Christmas when I got this lovely little Hero Arts bauble.
So here we go: 
Cut a piece of thick white card 13.5 x 13.5cm (I use Southfields 290gsm White card)

Blend 3 shades of a similar colour palette onto the card using Cut'n'Dry foam. I used Distress Inks - Tumbled Glass, Broken China and Chipped Sapphire. 

Mask off the bottom 4cm with Post-it notes. Ink up a background stamp with Versamark and spritz with water. The Versamark helps keep the water on the stamp. Stamp onto blended background, press firmly then lift off. The water removes some of the ink to reveal the negative resist. Heat set with your heat gun.  


Mask the top section and spatter a few drops of water onto the blended background to create some distressing. Then stamp with another background stamp. I have built up a few larger stamps over the years as I love to create my own backgrounds. You can of course use smaller stamps to build up o background.

 For my pine branch to hang the baubles I have used Stampendous Ponderosa Pine and used it 2 or 3 times to build up the branch. For the colours I have used Tombow brush markers directly on the stamp and spritzed lightly with water.


I stamped a bauble onto a scrap of white card that I blended at the same time as I blended the main piece. Cut this out.

 Stamp a couple of the baubles onto the main panel in you chosen colour. A strong colour ensures that they stand out. I have used Versafine Deep Lagoon. Also add your ribbon trim and stamp your sentiment. I also drew the lines to hang the baubles.

 To finish off layer onto a piece of coordinating card stock 14.5cm square. I sponged all the edges with Deep Lagoon before mounting onto a 6" white card blank. I applied crystal glitter to the cut out bauble for a bit of sparkle and attached with foam tape. A few gems to finish and your done.

I tend to batch these in 4's which is great for building up your Christmas stock.
I would welcome any feed back. I will try and figure out how to keep tutorials in a separate section so that they are easily accessible.
Pamela this one is for you!!

Woodware Design Team - Inspired by the Colours of Autumn

For my project this week I couldn't resist this new stamp from Stampendous CRR131 Cling Crowscape. I left out the creepy houses along the bottom which will be great for Halloween.

Crowscape

  • Cut a 14.5 cm square of background paper (this was plain orange). I distressed the paper by adding some scratchy lines and stamping the leaves down one side. 
  • Use a distressing tool or open scissors to rough up the edges and sponge panel with dark brown ink.
  • Blend 2 or three shades of orange ink on a panel of white card (7.5 x 9.5cm). Use the Woodware yellow circle punch to cut circle out of scrap paper. Sponge through with deep orange and red inks to create setting sun.
  • Stamp image in black and layer onto black card.
  • Stamp image again on scrap of background and punch out circle. Cut another circle from black card.
  • Layer up as shown. Finish off with your sentiment and black candies.

I forgot to mention I splattered some water onto the blended inks to create some distressing. I love these colours!!

Easy peasy!!

Friday 23 September 2011

Blogger Problems

Sorry guys, seem to be having a few blogger glitches. My previous posts keep disappearing off the Home page. Hoping it's a temporary problem, but please click on "Older Posts" to get to the next post. I need my son to come home and sort it all out!!!
Siobhan
Here's a bit of a cheat card. I made about a dozen of these Christmas Cards last year in blue but decided to make it in  browns this year. Janet at the retreat liked this one best so this is for her!!

The Stamp Man Challenge - A Perfect Pear

When I arrived at the retreat at Beamsley last Friday, Janet (part of Lovin' Ink) told me I had won the last Stamp Man Challenge. So I was really chuffed. We just happened to manage a trip to the shop the next day and I was able to spend my voucher (and a good bit more!!). Then Jill (Mrs Stamp Man) asked if I would like to join the Design Team!!!
Well I was so surprised but delighted too. I try to enter their challenge every fortnight because of the high standard of entries to look at.
So this is my first go!! I didn't have alot of time for this one so it's a quick project. Janet lent me her pear stamps at the retreat and I finished off the sample at home. The pear I used is a beautiful patterned pear by

Here is what I did with it: 


The background was made by blending 3 colours of Distress (Antique Linen, Scattered Straw and Brushed Corduroy). Then I inked up the large Music background stamp (Hero Arts) with Versamark and spritzed with water. I stamped onto the background card. This lifts off some of the ink to create a subtle resist in reverse. I love this technique as a first layer of stamping when building up backgrounds.The swirl at the side is another beautiful Hero Arts stamp called Fabulous Flourish (well named!!). I stamped this with second generation Brushed Corduroy.
I stamped two pears. One I cut out with an oval nestie and the other I cut out the pear without the leaf and stem. The cut out pear was then shaped on a mat with a big ball embossing tool and then silicon glue applied in the hollow to keep the rounded shape. This was a technique shown to me by the lovely Liz on the retreat!!
The rest is pretty easy to work out. All the embellishments are die cut with Spellbinders. I bought the Foliage set (where the leaves came from) this weekend too. The quote is from one of Tim Holtz's Stampers Anonymous sets CMS110 "Stuff to Say"

To show detail of the background
All the products used in this card are available from The Stamp Man. Remember to check out what the rest of the DT did with this challenge and drop by the Stamp Man Challenge Blog.
It seems a bit unreal to be part of such a talented DT!!
Siobhan
Related Posts Plugin for WordPress, Blogger...